Posts

ICAD Warm-Up, Using a Viva Las Vegas Stamp

Image
Hello again, everyone!   Man, it’s been a while since I last posted.   It’s a challenge to juggle work, home life, make and edit video, write blog posts AND have fun creating, but I hope to do a better job with it. So much (artsy-wise) has happened – more swaps, more cards and look!    I bought a 2-lb grab bag of stamps from Viva Las Vegas Stamps (their online store is here .)     This is a bit out of character for me, as I am wary of grab bag and random bulk buys.   In my head (and I know this isn’t always the case), I associated “grab bag” with “things that didn’t sell.”   I did some research online, and I didn’t see where other people had recently posted their grab bag hauls – I was worried about getting a bunch of political, religious, or super-basic stamps, but in the end, I am glad that I took the leap and ordered them. So can you guess how many stamps is in a 2-lb grab bag?   152 stamps!   Wow…that’s a lot for one haul!    I have a video of all the sta

Mixed Media Inchies

Image
Hello again, everyone!     I am back with a bunch of mixed media inchies to show you!   If you are not already aware, an Inchie is just a 1-inch by 1-inch square that is arted up in some way.   If it was a 1-inch circle, that would be called a “Rinchie”.    I do have a video on this, so if you’d rather watch the video, scroll to the bottom of this post or follow this link .   (I will warn you now...I need to redo it.  The video wouldn't play back correctly on my laptop, so I wasn't able to edit it right.  It's super fast in parts and the subtitles are...well...I would have done it differently if I had know how it looked in the end.) In this case, I joined in a swap where the host provided 8 inchies she punched from various scrapbook papers, and we had to art them up.   Then we would mail the finished inchies back for the host to swap out.   As of this post, I haven’t received the returns yet, so I am waiting on pins and needles to receive my returns. If any

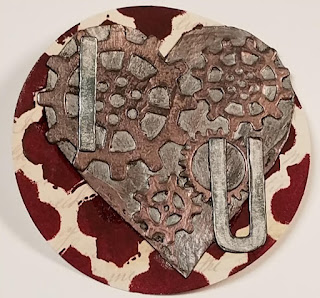
Valentine's Steampunk Artis Trading Coin

Image
Hello again, you wonderful people!  I am back with the last of four Valentine's-themed artist trading coins.  I do have a video up on YouTube, so if you are interested in watching it, please scroll to the bottom of the page or follow this link . I started off by punching the 2.5-inch circle from thickish scrapbook paper, then I traced the heart shape onto a different scrapbook paper and cut it out. (Not that it matters much, but the scrapbook paper I used for the coin shape was double sided, and I ended up painting over the opposite side from what you see in the photo below.) To make the gears, I cut them out of scrapbook paper using the Sizzix/Tim Holtz "Gearhead" die set. I glued the gears onto the hearts and then I covered them black gesso made by Liquitex.  This will make adding the wax more striking. When they were dry, I pulled out the Finnabair Art Alchemy Metallique Waxes in Brushed Iron and Rose Gold. To start, I used an old paintbrush to add

Valentine's Artist Trading Coin #3: Pair of Hearts

Image
Hello, everyone!  Today I have number 3 of 4 Valentine's Artist Trading Coins to share with you!  This coin features a pair of pink hearts.   I also have a video at the bottom of this post and at my YouTube channel here . I started off by punching out the coin shapes from mixed media paper and book text.   I glue the two together and put a light layer of gesso onto the bookpage.  I ended up covering it all with the paint, so in the end, using the book page as a layer was a moot point, haha.  I also cut two hearts ono printer paper, cut them out, and then used them as a template for cutting the hearts out of mixed media paper. I pulled out my Tattered Angels Glimmer Mists in "Cherry" and "Pink Bell" and spritzed them onto the hearts.  I rarely ever use any of my sprays because I am guaranteed to make a mess, but this time I put the hearts into a cardboard box before spraying them, which really helped contain the mess!  I wanted my hearts to have a shimmer

Valentine's Artist Trading Coin Featuring Tim Holtz's Crazy Cat

Image
Hello, everyone!  Welcome back!  In today's post, I will show how I made the second of four Valentine's coins.  These are for a swap where four people each had their own theme.  The first coin was a bacon and egg theme, and this coin's theme was a cat, so I chose to use a Crazy Cat from the Tim Holtz/Stampers Anonymous Mini Crazy Cats and Crazy Dog stamp set. I do have a video of how I made these coins, so if you are interested in watching that, you can go here or scroll to the end of this post. Sorry for the poor photo - I just couldn't get good lighting.  Anyhow, I started by punching out 2.5" circles from mixed media paper and bookpages.  I glued the pieces together and then used a wash of white gesso by Liquetex gesso over the bookpage to push the text into the background.  As you can see in the photos above, you don't see much of the bookpages any more. I stamped the cats from the Tim Holtz stamp set onto the Canson mixed media paper, and colored

Creating an Angry, Volcanically Active Planet with Acrylics and Crackle Medium...

Image
Hello and a Happy New Year everyone!  For those who celebrate, I hope you had a wonderful holiday season. For today's post, I will show you how I made angry, geologically active alien planets using acrylic paints and crackle medium. These cards were so hard to photograph, and the pictures below have been manipulated a bit so you could (hopefully) see more details in the planet's surface.   I have to say, I am in LOVE with how this turned out!  You can watch the video on this too by scrolling to the bottom of this post. To start, I used a circle stencil to lightly trace partial circles onto my cards.  You can use any circle shape or even free-hand it, but I used Donna Downey's "Bubble" stencil. My next step was to paint in the partial circles with reds and orange fluid acrylics.  I didn't bother to mix or blend the colors, since I knew most of it would be covered up, but I wanted some variation in colors for those areas that did show through the crackl

Mixed Media ICAD, Using Up Some Scrappy Papers

Image
Mixed Media ICAD, Using Scrap Papers From My Stash Hello, everyone!   I am back with another ICAD – this time, I was determined to use up some of my leftover bits of papers and used postage stamps.   I will apologize up front, as some of the photos aren’t very clear, but I used the ‘snapshot’ feature on some of them using a video editing software, and the images became blurred when I made them bigger.  Yes, you heard right!   I made my very first YouTube video!   Whoot, whoot!    I’m doing the jiggy dance as I type this – soooo…I still have areas that I need to improve on, but hey, you never learn if you never ‘do’, right?   If you are interested in the video, you can find it here or find it at the bottom of my post.   That being said, I don’t think I will use photos from the video anymore.   They just get too fuzzy when I enlarge the images.   Lesson learned for next time! As I mentioned above, I have too many leftover bits of papers that I used in other projects….boo