Hello again, everyone!Man, it’s been a while since I last posted.It’s a challenge to juggle work, home life,
make and edit video, write blog posts AND have fun creating, but I hope to do a
better job with it.
So much (artsy-wise) has happened – more swaps, more cards
and look!I bought a 2-lb grab bag of
stamps from Viva Las Vegas Stamps (their online store is here.)This is a bit out of character for me, as I am
wary of grab bag and random bulk buys.In my head (and I know this isn’t always the case), I associated “grab
bag” with “things that didn’t sell.”I
did some research online, and I didn’t see where other people had recently
posted their grab bag hauls – I was worried about getting a bunch of political,
religious, or super-basic stamps, but in the end, I am glad that I took the
leap and ordered them.
So can you guess how many stamps is in a 2-lb grab bag?152
stamps!Wow…that’s a lot for one haul! I have a video of all the stamps I received here, if you want to see what I received. I like most of what I got, and actually loved
a number of them.
When they produce their stamps, they manufacture them on a
rubber mat called a plate, and this is what I received – plates of rubber
stamps, not a bunch of individual stamps.There was one or two stamps missing from each plate, so you end up
receiving incomplete plates.I received
a variety of stamps, which excited me.
Now came the hard part – choosing the first stamp to play
with!Out of all of them, I choose the
NASA Jet.I love all things NASA and I
actually like old planes (okay, this jet probably isn’t that old, but the point
still stands!LOL)
Because Daisy Yellowwill be
hosting the Index Card A Day challenge soon, I decided to work on a 4x6 card,
which is the size of the index cards I will be working on this year.I glued a graph-paper patterned scrapbook
paper to it, as NASA is all about math and science, and I remember having to do
math problems on a similar graph paper in school.I trimmed the card, but I didn’t seal it with
Mod Podge or matte medium, because I planned to use Distress Inks, and I wanted
the inks to soak into the paper, not stay on the surface.I used Old Paper and Tea Dye in the Distress
Inks, and Vintage Photo in the Distress Oxides.There was no rhyme or reason on using the Inks versus the Oxides – it was
just whatever I happened to grab at the time. I used the tried and true spritz-and-smoosh method
to add the inks to the paper. I did the
same thing to the globe, which was from a Tim Holtz ephemera pack, then I edged
the globe and card with Walnut Stain Distress Ink.I
decided that I needed more on the background, so I did end up stamping a
chevron stamp (also from VLVS) in Pumice Stone Distress Ink.
Now for the stamp!The NASA jet was facing in the wrong direction –when you stamp it, the nose points to the
left, but I wanted it to point to the right.This wasn’t a problem though, because I stamped it on thin, white tissue
paper with archival ink.Then you just
flip the tissue you paper over, and viola!The stamp faces in the right direction.The only downside is that any words, like “NASA” and “USAF”, are
reversed.I don’t mind that, though.
I glued the stamp onto a piece of scrap mixed media paper
then fussy cut it out.I colored it with
Brushed Silver Distress Paint mixed with a bit of Hickory Smoke Distress Stain,
and then I added highlights with Barn Door stain.I also splattered the Brushed Silver/Hickory
Smoke mix to the card – it adds an extra level of grunge to the card that I
loved.
Assembling everything was easy – I glued the globe on the
edge of the card, then cut off the excess.I then glued the trimmed off part to the right side of the card.I added the jet and the words “Replace fear
of the unknown with curiosity.”I
thought it was perfect for the card. What do you think?
And that’s it for today!That’s so much
for stopping by – check out the video below to see how I made this.Until next time!
Thank you for your sweet comments on my post over on Viva's blog! I see the last post you need was actually an index card! And on my birthday! I absolutely love this index card! I have actually bought a ton for Vivas grab bags I always end up with way more Sam's I love than what the cost would be to have bought them individual!! I of course always have to buy a couple bags in February when they do their giant sale. Last year I think I ended up buying four 1 pound bags! Then I keep all my duplicates are stamps I don't love in a tub for swaps. I haven't watched your video yet I'm about to watch it to see what stamps you got. Have a happy New Year
So I couldn't figure out where to leave a comment on your YouTube Oh, but looks like you got lots of good stamps in your grab bag! If you're ever looking for a specific stamp and want to swap let me know. I may have it as a duplicate. I'm going to have to look up that lionhead stamp and add him to my wishlist there are several in your grabbag I still don't have even after years of Designing with vlvs!!!
Hello, everyone! Today I have number 3 of 4 Valentine's Artist Trading Coins to share with you! This coin features a pair of pink hearts. I also have a video at the bottom of this post and at my YouTube channel here . I started off by punching out the coin shapes from mixed media paper and book text. I glue the two together and put a light layer of gesso onto the bookpage. I ended up covering it all with the paint, so in the end, using the book page as a layer was a moot point, haha. I also cut two hearts ono printer paper, cut them out, and then used them as a template for cutting the hearts out of mixed media paper. I pulled out my Tattered Angels Glimmer Mists in "Cherry" and "Pink Bell" and spritzed them onto the hearts. I rarely ever use any of my sprays because I am guaranteed to make a mess, but this time I put the hearts into a cardboard box before spraying them, which really helped contain the mess! I wanted my hearts to...
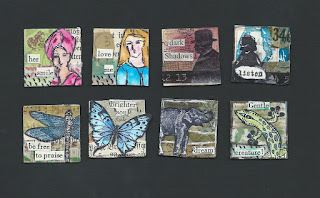
Hello again, everyone! I am back with a bunch of mixed media inchies to show you! If you are not already aware, an Inchie is just a 1-inch by 1-inch square that is arted up in some way. If it was a 1-inch circle, that would be called a “Rinchie”. I do have a video on this, so if you’d rather watch the video, scroll to the bottom of this post or follow this link . (I will warn you now...I need to redo it. The video wouldn't play back correctly on my laptop, so I wasn't able to edit it right. It's super fast in parts and the subtitles are...well...I would have done it differently if I had know how it looked in the end.) In this case, I joined in a swap where the host provided 8 inchies she punched from various scrapbook papers, and we had to art them up. Then we would mail the finished inchies back for the host to swap out. As of this post, I haven’t received the returns yet, so I am waiting on pins...
Hello, everyone! Welcome back! In today's post, I will show how I made the second of four Valentine's coins. These are for a swap where four people each had their own theme. The first coin was a bacon and egg theme, and this coin's theme was a cat, so I chose to use a Crazy Cat from the Tim Holtz/Stampers Anonymous Mini Crazy Cats and Crazy Dog stamp set. I do have a video of how I made these coins, so if you are interested in watching that, you can go here or scroll to the end of this post. Sorry for the poor photo - I just couldn't get good lighting. Anyhow, I started by punching out 2.5" circles from mixed media paper and bookpages. I glued the pieces together and then used a wash of white gesso by Liquetex gesso over the bookpage to push the text into the background. As you can see in the photos above, you don't see much of the bookpages any more. I stamped the cats from the Tim Holtz stamp set onto the Canson mixed media paper, an...


Thank you for your sweet comments on my post over on Viva's blog! I see the last post you need was actually an index card! And on my birthday! I absolutely love this index card! I have actually bought a ton for Vivas grab bags I always end up with way more Sam's I love than what the cost would be to have bought them individual!! I of course always have to buy a couple bags in February when they do their giant sale. Last year I think I ended up buying four 1 pound bags! Then I keep all my duplicates are stamps I don't love in a tub for swaps. I haven't watched your video yet I'm about to watch it to see what stamps you got. Have a happy New Year
ReplyDeleteSo I couldn't figure out where to leave a comment on your YouTube Oh, but looks like you got lots of good stamps in your grab bag! If you're ever looking for a specific stamp and want to swap let me know. I may have it as a duplicate. I'm going to have to look up that lionhead stamp and add him to my wishlist there are several in your grabbag I still don't have even after years of Designing with vlvs!!!
ReplyDelete