Posts

Showing posts with the label Dina Wakley

Mixed Media Inchies

Image
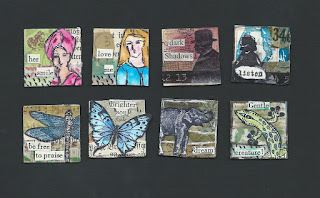
Hello again, everyone!     I am back with a bunch of mixed media inchies to show you!   If you are not already aware, an Inchie is just a 1-inch by 1-inch square that is arted up in some way.   If it was a 1-inch circle, that would be called a “Rinchie”.    I do have a video on this, so if you’d rather watch the video, scroll to the bottom of this post or follow this link .   (I will warn you now...I need to redo it.  The video wouldn't play back correctly on my laptop, so I wasn't able to edit it right.  It's super fast in parts and the subtitles are...well...I would have done it differently if I had know how it looked in the end.) In this case, I joined in a swap where the host provided 8 inchies she punched from various scrapbook papers, and we had to art them up.   Then we would mail the finished inchies back for the host to swap out.   As of this post, I haven’t received the returns yet, so I am waiting on pins...

Alterned Rolodex - A Snarky New Year

Image
Hello and welcome back!  I'm so sorry for the disappearance, but I was in a class that ate into my artsy time, but now I am back with a trio altered rolodex cards for you.  These fun little beauties are for a "Snarky New Year's Resolution" swap on the ATCs For All site I trade at.   I was excited for this swap, as it gave me a perfect excuse to use the new Dina Wakley Essential Silhouette stamps that I had just bought.  I blame MixedMedia Jenn ; she had been using stamps from this and a another stamp set over on her YouTube channel, so I eventually broke down and bought them.  I just needed an reason to use them, and this swap was the perfect venue! To start with, the rolos I used are cut from Canson mixed media paper.  I have a circular rolodex file with the 1.25x4" cards, but those are too thin to handle what I'd put them through, even if I glued multiple layers together.  Also, since these rolos are for a swap, I needed to make sure they were ...

Artist Trading Cards - The Owl and the Snail

Image
Hello, all!  Thank you for taking the time to stop by and check out my projects!  Today, I wanted to show some insight in how I made some of my previous artist trading cards (ATCs).  Well, one was "previous" and one was completed today.  These are the cards (and altered puzzle piece) that I will walk through. First off, the newest project.  Since this is a new blog, I'm fairly certain that the recipient of one of the card won't see this yet, so I will go ahead and share. As mentioned, I like to make two of whatever I make.  One for me (usually the 'experiment') and one to trade. In the cards above, I randomly spread Dylusion paints onto the card with my fingers - the paints are so creamy, and blends so easily!  Next, I took some background alphabet and number stamps and stamped with Ranger's Archival Ink. When dry, it's permanent and won't smear if you add wet mediums to the card.  I also dabbed gel paint through a leafy sten...

Artist Trading Coins

Image
I first heard about Artist Trading Coins (or circles) from the trading site ATCs For All.  A wonderful crafty artist Craftyhodges first posted about it on her YouTube channel here . She explains it, but for the purposes of this blog, it's a 2.5-inch circle that you art up, exactly like Artist Trading Cards (ATCs). I am in the midst of creating some more, so I will eventually share some pictures of the process, but in the meantime, here's a photo of what I submitted to the trading forums. Top Left: I stamped the bird onto Japanese text paper and colored it with Tim Holtz Distress Inks. covered paper with a layer of Mod Podge and set it aside to dry.  I then re-stamped the bird onto plain paper so I could mask the bird.  I then stamped the cherry blossoms and colored them in with Faber-Castelle brush markers. I glued it to a cardboard base to give it some thickness (formerly known as a Mt Dew box) and drew sketchy lines around the outer edge. Top Right:  I do...